


Welcome to another edition of Elf Take! I’m your host, Skip Tasteless. Today we are heading back to the Old World Football League and reliving the exciting AFC conference championship between the Darkside Marauders (9-4-3) and the heavy favorite Brackish Brawlers (13-3-0). As a high elf, you know I love my one turn TDs! Today’s game, however, has you pitted against a different challenge… Now you’re trying to prevent one against a devilish skink named Six, a phenom with MV9, AGI 4, Sprint, Side Step, and Sure Feet! Good luck! Mua ha ha!
Darkside Marauders (Chaos) vs. Brackish Brawlers (Lizardmen)

It’s turn 16. The coach for the Marauders jasfoz22 has fought valiantly and has whittled down Darken-Rahl’s Brackish Brawlers to 7 players. Not only that, but he was able to score the game-tying TD on his last turn! The Brawlers still have one turn left, and Six is in the backfield licking his chomps for the ball!
You’re the Chaos coach. The Brawlers don’t have any rerolls left. What’s the best defensive formation that will prevent the easy 1 turn TD? With side step, Six has to be chain pushed once before he can run the entire length of the field for the score. What play do you call?
Objective
- What is the defensive formation that will minimize the probability of Six scoring. Remember, the Brawlers will setup their own 1 turn TD attempt based on your defense.
Rules
- For simplicity, assume “Perfect Weather” is rolled (just like it did during the game) and plan for that.
- Skink #9 is located at (H, -8)
- The ball lands at (J, -7)
- Darken-Rahl can ball and will try to score. All other Lizardmen can be positioned and will be positioned to score with greatest probability of success!
- The Brackish Brawlers have no rerolls.
- Download my Blood Bowl Challenge #12 Playmaker Template. You can open it by installing open source image editing software GIMP. Now you can create your own plays!
- Access the BBTactics Forum and post your solution! Instructions on how to create your play are included at the forum.

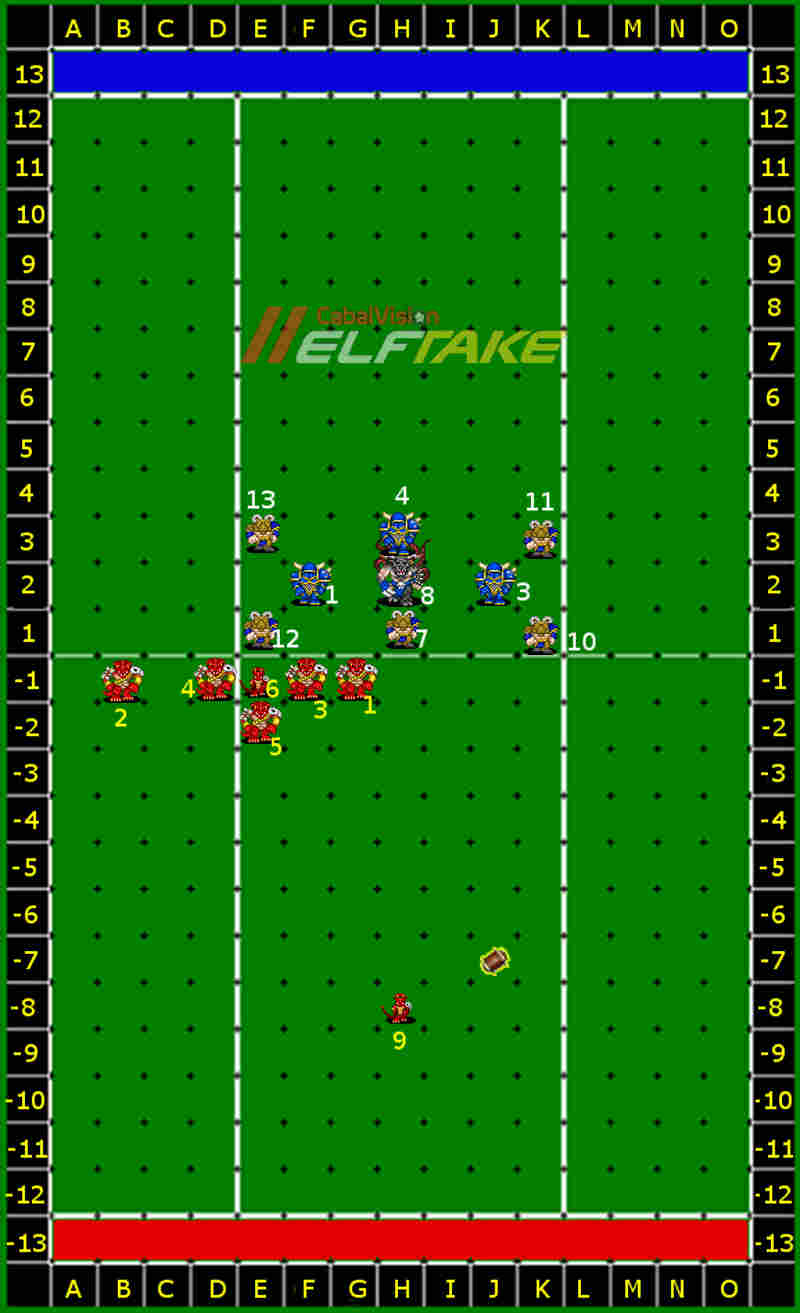
In the actual game Darken-Rahl was able to score by:
- Throwing a block with Saurus #1 against Beastman #7 and pushing him away to I2 and following up.
- He then “completed the square” by moving Saurus #5 to F1.
- Saurus #2 then blitzed Beastman #12 from D2. Saurus #2 pushed Beastman #12 from E1 to E-1. Skink #6 is chain-pushed, but uses his sidestop to move to D1. Saurus #2 continues his frenzy and pows Beastman#12 from E-1 to F-2
- Skink #9 then picked up the ball (Sure Hands) and handed it off to Six who went in for the score (3 GFIs with Sure Feet).
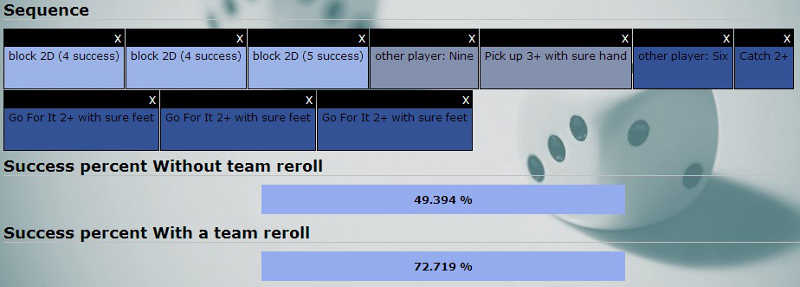
According to the Samba Action Calculator, the touchdown Darken-Rahl scored with Six had a ~49.394% chance of success. After setting up your defense, figure out the best way to one turn TD against it and see if you can get a lower score.
Rosters
Darkside Marauders (Chaos)
| # | Position | MV | STR | AGI | AV | Skills |
|---|---|---|---|---|---|---|
| 1 | Chaos Warrior | 5 | 6 | 3 | 9 | Block, STR+, STR+, Mighty Blow |
| 3 | Chaos Warrior | 5 | 4 | 3 | 9 | Block, Guard, Side Step |
| 4 | Chaos Warrior | 5 | 4 | 4 | 9 | AGI+ |
| 7 | Beastman | 6 | 3 | 3 | 8 | Horns, Wrestle, Tackle |
| 8 | Minotaur | 5 | 5 | 2 | 8 | Thick Skull, Horns, Mighty Blow, Frenzy, Loner, Wild Animal, Claw, Juggernaut, Tentacles |
| 10 | Beastman | 6 | 3 | 3 | 8 | Horns |
| 11 | Beastman | 6 | 3 | 3 | 8 | Horns, Block, Mighty Blow, Guard, Piling On, Tackle |
| 12 | Beastman | 6 | 3 | 2 | 8 | Horns |
| 13 | Beastman | 6 | 4 | 3 | 8 | Horns, STR+, Block, Mighty Blow, Frenzy, Strip Ball |
Brackish Brawlers (Lizardmen)
| # | Position | MV | STR | AGI | AV | Skills |
|---|---|---|---|---|---|---|
| 1 | Saurus | 6 | 4 | 1 | 9 | Dodge, Block, Guard |
| 2 | Saurus | 6 | 5 | 1 | 9 | Block, Guard, Mighty Blow, STR+, Frenzy |
| 3 | Saurus | 6 | 4 | 1 | 9 | Block, Mighty Blow, Guard, Break Tackle, Dodge |
| 4 | Saurus | 6 | 4 | 1 | 9 | Block, Guard |
| 5 | Saurus | 6 | 4 | 1 | 9 | Block, Guard, Frenzy, Mighty Blow, Piling On |
| 6 | Skink | 9 | 2 | 4 | 7 | Stunty, Dodge, MV+, AGI+, Sure Feet, Sprint, Side Step |
| 9 | Skink | 8 | 2 | 3 | 7 | Stunty, Dodge, Sure Hands, Sure Feet |
[toggle title_open=”Hide Tad30 Solution” title_closed=”View Tad30 Solution” hide=”yes” border=”yes” style=”default” excerpt_length=”0″ read_more_text=”Read More” read_less_text=”Read Less” include_excerpt_html=”no”]
This is a great solution. The sidestep Chaos Warrior is an excellent obstacle to a one turn TD. The STR 6 Chaos Warrior also makes it difficult to chain push as well. It can be done, but if a blitz is used to push the the STR 6 Chaos Warrior towards the center of the field then Six will end up in tackle zones that will hinder his catching. But there is still another way to go after it…

- Saurus #3 blocks Chaos Warrior #3 to move him away from Saurus #2.
- Saurus #4 moves to (E,2)
- Pick up the ball with Skink #9 (Sure Hands) and GFI once (Sure Feet) to E1 hand off to Skink #6 (2+ Catch).
- Saurus #2 frenzies Chaos Warrior #1 to (F,1) to (E,-1) pushing Six to D1.
- Six dodges out and makes the score. (2+ dodge and 3 GFI’s)

Tas30’s solution effectively cuts the chance of scoring in half. The biggest probability sink within the entire chain of events is the required push result on the first 2D block by Saurus #2. Can anyone think of a better defensive setup or offensive attack against Tad30’s solution? Let me know!
[/toggle]
I’ve set a challenge to do it under two minutes, otherwise I’d not fit the coaches shoes. Here goes : Asuming the Minotaur REALLY has STR4 your biggest assets are CW1 and CW3. 6 STR and Sidestep both make a OTT very unlikely. They go at the edges, and they are more or less safe.
C1 : E1
C3 : G1
C11 : D2
C4 : H2
C7 : B3
C8 : I3
C10 : G3
C12 : E3
C13 : F1
Any beneficial blitz-pushes, on anyone, ever, require a dodge into 3 tackle zones. Even if that succeeds, it has to either be a push on D2 or H2 with the Saurus with Frenzy (twice the chance to fail)
OR! a push against STR6+Guard+assists on E1
OR! a push against side step.
OR! push C13 to the side, but is he going to get enough guard on the middle piece, to make it a favorable dice?
If the mino has STR5, and not 4, i would position the pieces a bit differently.
Lizards have a lot of guard, but there is no way around dodging into places, where they can not dodge. Their STR5 saurus doesnt have BT. Their dodger will have to have STR4. STR4 BT into 3 TZ’s is a shitty chance.
4 TZ’s actually* Either that, or dodge with the Frenzy piece… Without BT.. Into 3.
I also meant C3 not B3 for Chaos #7. Damn those coordinates, i say!
Minotaur stats were wrong. Correct stats are updated. He has 5 STR.
Then i’d put the Mino in F1, making even that push very, very unlikely,. (Not only that, but Mino’s Tentacles will hold the skink in place, so it’d need a POW/Stumble, if the mino is used as the push)
To summ it :
X – empty space
C – chaos
CXCXCXC Unimportant which pieces go here.
XCXXXCX Beastman 11, Beastman 13
XXCCCXX Warrior 1, Mino, Warrior 3.
Sauri need to make a crazy dodge into 4 TZ’s to push their skink, and each push they could try to make (even after the dodge) is unlikely. Having side step, STR6 + guard, and STR5 + guard + tentacles to choose from.
Or a 6+ dodge to frenzy chainpush Beastmen 11 or 13.
The only reasonable strategy to deal with this here is blocking Warrior 1 or Warrior 3 away from the line, and then frenzy pushing one of the beastmen without having to dodge. But even then you choose between Side Step and STR6 + Guard. Even then, the skink has to make at least 3 dodges, unless POW’s / Stumbles were rolled.
You’ve definitely complicated things, but you can still make the TD with 2D blocks and by increasing the catch to 3+. Look at solution. Can you do better?
Kind Skip. You’ve moved my entire column two spaces to the right. The entire point of my defense was using the sideline to limit the movement of skink 9 and limit the players able to assist on CW1. Skink #9 would not be able to assist nor help chain pushing, due to movement issues.
Although it would still be possible with more or less the same dice…. But how about this :
Chaos 1 : F1
Chaos 3 : H1
Chaos 4 : I2
Chaos 7 : B3
Chaos 8 : G1
Chaos 10 : E3
Chaos 11 : E2
Chaos 12 : J3
Chaos 13 : B2
I can think of a few ways of still scoring that OTT, but with much lesser chances.
Alternatively, we could just fine-tune the previous setup, by changing the positions of Minotaur 8 and Beastman 11. Adding a tentacle roll to that dodge of “Six”, and another guard to mess up all the blocks. I trust you’ll find a decent way to score that OTT, but i’m sure we can get the chance down to 1 didig.
I think you are missing some things in your analysis of the “Tas30” solution.
1) The initial block is actually only a 1D block (you have it listed as a 2D 4-success block). Saurus 3 is a Str4 with 2 guard assists (ST6), vs a ST5 Minotar, but the Chaos 3 Sidestep warrior also has guard. So ST6 vs ST6. That should also hurt the probability.
2) You said Skink 9 uses 2 GFI’s, but if I look at the position of the original map, it is only 9 steps (not 10), so that cuts out another GFI.
I’m assuming Saurus 3 follows up the push against Mino 8, otherwise the first hit on Warrior 1 is also only 1D. (You didn’t actually list that, though it is certainly possible to do it.)
With the changes I made, I got 20% w/o reroll, 42.2% with. With the caveat that Samba Action Calculator doesn’t do conditional probabilities. (If you get a stumbles or defender down on the final 2D frenzy block you don’t need to dodge out.)
1.) The Mino surprisingly doesn’t have guard. So the block on the sidestep Chaos Warrior should be a 2D block. You have to block him away so Saurus #2 can get a 2D block against Chaos Warrior #6.
2.) Ahh you’re right! You only need 1 GFI. Dang it. I have to redo the Samba graphic. And yea, I agree with you, Samba doesn’t do conditional probabilities and for all intensive purposes it’s (look at Blood Bowl Challenge #007 to see how to calculate it) not really necessary since the 2+ roll /w reroll does not significantly degrade your chances. It’s the 2D required-push that throws a wrench in the scheme.
Speaking of conditional probabilities. The probability of success for this scenario is just a tiny bit higher. Saurus #3 can still roll a both down against the sidestep Chaos Warrior. If that’s the case, Saurus #2 will have to do a 1d, 2d frenzy block against the STR6 Chaos Warrior.
Either way, given the 4 min… I don’t think I would have gotten this, but I have to admit these problems are definitely helping me in the vision department.
The more I think about it, the more I like modifying Tad30’s solution a bit….
Beastman #11 at C3
Beastman #10 at K3
Beastman #7 at M3
Chaos Warrior #4 at F2
This puts the tackle players on the flank negating Six’s dodge and making him roll a dodge twice. If Darken-Rahl chooses to sidestep Six through the center he has to chain push him 2 times to get him there. He then has the Mino’s tentacles to contend with PLUS the only way to get Six the ball is through tackle zones. I have to take a look at this when I get back.
I’m glad You like my usual OTT defense setup. But how about the second one I’ve suggested?
To quote :
Chaos 1 : F1
Chaos 3 : H1
Chaos 4 : I2
Chaos 7 : B3
Chaos 8 : G1
Chaos 10 : E3
Chaos 11 : E2
Chaos 12 : J3
Chaos 13 : B2
To be honest, most of the pieces can be moved around to find the sweet spot. The important bit are the line, the support that prevents lizards from surrounding the Side Stepper, and the guard support for the STR6 guy (with his own support, to prevent frenzy push).
That leaves quite a few pieces open to shuffle around. To be perfectly honest with you, i focus on preventing the chain push more, than on Tackle, and STR4 is more important in that regard. A single easy blitz will make that entire defensive construction fall apart. We have to ensure there are none!
Tad, I like your last one a lot, it adds a couple dodge zones, though honestly it is an AGI4 stunty, so they are all 2+ w/ Dodge reroll (except you correctly put the Tackle player in the way)
I almost wonder if you just move Beastman 11 from E2 and put him in D2. That would prevent moving players to create the push wall on CW1 (you’d have to dodge into 3 tackle zones w/ tackle.)
I don’t think you can just say that Skink 9 can’t GFI into place, as I think this defense cannot depend on where the ball lands. However, you can say that moving the beastman away from base-to-base with the ST6 makes it harder to build a push wall, and you still cover his corner.
You do still need B13 in B2, otherwise the Frenzy Saurus 2 could just wrap around and double block him back in.
Actually, I wonder if you have that problem now with Beast 12 being so far up.
The Saurus need 8 for this, but that is what they could do:
So they line up heavy around J1. With Six at K,-1.
Then they put whoever they want into J2, J1, K2, K1, and have someone start at I -1, fill a hole at J-1 with Skink 9. Then you wrap around and block K11, which can be any push.
Note that because Six has Side Step, they could have done that with the original layout. Mark D2 and D1, put Six at D-1 block 13 back to chain through and pop 6 out.
And with Frenzy, you don’t need to mark D2 if you go for a push on your first block.
Also Skip, your original analysis of probability is wrong. The screen shot you reported with the original submission starts with 2 “Block 2D (4 Success)”, but that isn’t true. You have to get a push popping 12 back into the group so that you can frenzy the other way. Because you need that initial “push” the probability of what he did is pretty low.
However, the way the original player played it was also wrong. If, he lined up with a six at E, and players at F G H, he could block H1 and any result that removed the tackle zone on G1 is fine (5 success). Then he moves G1 to F1 (no dodge because he wasn’t marked ahead of time).
Then does a single block on F1 needing push/stumble/down. That will let him push six up immediately with Side Step. If he gets a down, he can stop, as Six doesn’t have to dodge anyway. If he doesn’t, he has the player at F1 which can throw a 2D (3D?) block on him. And if he moved Skink 9 to D-2, that second block could push Six both out of the tackle zone, but also one deeper, meaning one less GFI. Dodge and GFI are both 2+. But they are on different rerolls. So I think you actually prefer to trade 1 dodge for 1 GFI (if you reroll the dodge, you still have Sure Feet to reroll the later GFI). (GFI GFI w/ Sure feet is 92.5% success, but GFI Dodge w/ Sure Feet Dodge is 94.5% success).
That allows no GFI from Skink 9 as well. So I think it is, same setup as shown in the beginning, except swapping Saurus 5 from F-2 to H-1, and Saurus 4 & 2 swap places.
He 2D blocks H1, 5 success.
Skink 9 picks up the ball, runs it to D-2 and hands off to Six at E-1 (small extra difficulty because Six is still in a tackle zone). G-1 moves up to F1. Saurus at B-1 moves to D2, 2D blocks E1, pushign him straight down into Six and E-1. If it is defender down or stumbles, Six runs it in for 3 GFIs.
If it is Pushed, then F-1 3D blocks and chain pushes Six all the way to C2. If that is a down/stumbles, you don’t need to dodge out for 2GFIs. If it is just a push, you dodge out with skill and 2GFI. If it is a block, you are back to the 3GFI.
Note: 3GFI 86.8/91.6%. Dodge + 2 GFI = 90.0/91.9%.
I would love to do the branching percentages on this, but if we assume 86% and 90% are close enough together, I can go the ‘worse’ case result with
1 2D block 5 success
1 3+ pickup (sure hands)
1 3+ catch (AG4 in 1 Tackle Zone)
1 2D block 4 success
so far, 51.2/75.4%
And the branches
def down/stumbles 3GFI: 44.5/67.9%
or push lets you
3D Block 5 success: 50.9/75.2
and then one of:
2GFI (on stumbles/down): 47.2/70.7%
Dodge 2GFI on push: 45.8/68.7%
3GFI both down: 44.2/67.8%
So the 3D block gives you about 3% better chance to run it in (it more than pays for its cost).
If you can wait to hand off the ball until after getting the Mino 12 down (turning the 3+ catch into a 2+ catch) the value goes up to 58.9%/78.5%. But that depends if you have the range on Skink 9, or if he needs a GFI.
Actually, his SF GFI is better than the 3+ catch by a fair margin. Even 2GFI w/ sure feet is better than 3+ catch, though without sure feet it goes down fast.
Anyway, conditional probability sucks, but the key point is that the old layout had a slightly less risky play (I think, because of the push), and the new layout might be vulnerable to a chain push on the exposed Beastman in the upper right.
I’m at work so really can’t look at your solution now… I don’t think my original analysis was incorrect. I was watching the replay when writing the actions. The initial block was to Beastman #7. This allows Saurus #5 to move to (F, 1). Saurus #2 then blitzes from (D, 2) pushing / powing / stumbling Beastman #12 from (E,1) to (E,-1). This pushes Six up to D1. If Saurus #2 had rolled a defender down / defender stumbles, then the second block would not have been necessary. This would actually increase the probability of success for the in-game scenario.
Because it only takes one block to get Six into position, you are free from the restriction of a push-only block. This is why the probability of success is ~ 50% as compared to ~25% for the new solution.
Sorry I can’t reply to your comment for some reason. But yes Skip, my “it was wrong” was wrong in my understanding of the moves, because I originally didn’t realize the awesome power of Side Step.
I don’t quite see how he completes the square with the layout you drew.
On the flip side, we still have the argument that with Tas30’s new layout he has a very hard time filling the square around the ST6 warrior. However, he might be able to do it with the Beastman that it sitting alone on the right side. Essentially something like:
__X
_X
X
From the warriors, then the saurus fill:
__V
__X
_XOOO
X__OO
__OO6
And you push down, down-right, down, down-right and six can pop off.
However, I think that takes 8 Lizardmen + 1 to hit it from the top.
You can get the chain push with fewer lizards as:
__V
__X
_XOO
XOOO
O6
But you’ve blocked 6 from popping up.
However, with frenzy, you can do:
__V
__X
_X
XOOOO
O6
But it requires a push as the first frenzy hit.
So we’re back to the low probability, but just blocking the left hand side does open up the right.
Hey John and Tad30 and any other readers,
I’m getting pretty confused by all of the coordinates. I want to include your solutions in the article, but setting up everybody’s plays is cumbersome. I want to try something new. Here is a link to my Challenge 12 Playmaker. It requires the use of GIMP (an open-source image editor, basically the free version of Photo Shop).
1. Open the template with Gimp
2. Click on Windows -> Toolbox to open up the image editor tools (it should open by default)
3. Click on Windows -> Dockable Dialogs -> Layers to open the “Layers Window”. Every player and number is in it’s own layer. You can swap layers back and forth to bring graphics to the front or behind others.
4. Use the Move Tool to drag your players and numbers to the correct positions.
5. Save it as is and let me know… I can extract and post for you. If you’re technically savvy, you can create a JPEG image from your saved file by going to:
File -> Export
In the Name textbox, type in something like coach_name_12.jpg and click Export.
Gimp will detect that you want to convert to a jpeg. Set the Quality to 15 (this reduces file size) and then hit Export.
You now have an image you can post in your comments as well!
Hey John, I posted a solution against Tad30s defense. Is this what you talking about by attacking the right side?
http://bbtactics.com/forums/skip-tasteless-blood-bowl-challenge-12-discussion-t2747/
In the setup you’ve shown above, I would have thought you would swap 1 (Blodge guard Saurus) with 2 (Frenzy Saurus).
That lets you blitz 12 into 3 which is a 2D block, and then 2@G-1 would be your frenzy into 12 to push 6 out, and then knock 12 out of the way.. Though I can’t quite pick up the ball and hand it off without a GFI, I guess if you knock 12 down then you can just move 4 and 5 out of the way. If you didn’t, I guess 4=>12 with follow up, and then 5 just moves (or vice versa).
As for alternative defense, it does seem that putting your str6 on one corner and the side step on the other does most of what you want. Side step means it can’t just be pushed into a hole, and str 6 means he needs to use his frenzy + 2 assists (or 4+3 guard assists). If all you do in your diagram is swap 1 & 12, he can’t get a 2D block on 1 to push him back down (he has 3 assists, but 13 gives you +1 assist as well).
Though it also depends what his play is. Is it to 1TTD, or would it shift to gang fouling your ST6 player hoping to injure him before the rematch?
Assume he’s going for the score.
Whenever there’s an open space available to push to (in a relevant direction, of course) you can’t crowd-push, right? Of course that leaves the possibility open for the Lizardmen player to fill the gaps before pushing. If I am correct it doesn’t matter if the blocking player has frenzy or not (that’s just ‘block twice whenever there’s no knock-down’).
If that is correct, then why would the frenzy (mentioned in the scoring attempt in the solution) allow for a crowd-push leading to six being put into a potential scoring position? Shouldn’t the warrior be pushed to A1 or A2 instead?
Oops. Meant E1/E2, of course.
The full conversation has been moved here:
http://bbtactics.com/forums/skip-tasteless-blood-bowl-challenge-12-discussion-t2747/
As for your question, I don’t think this is about crowd pushing at all. There is something called “Chain Pushing”. If you push an opponent, and all possible places are occupied by someone (friend or opponent), you then get to pick *which* of the three squares you want to push into, and then that will “chain” a push into the next set of 3 (as though the target squared had done a block in the direction you selected).
In the original problem, you filled the space at F1 with Saurus 1, then attacked diagonally to push 12 into those 3 squares. Because they are full, you get to pick which one to push, and you choose Six. Because Six has SideStep, he gets to pick not just from the 3 squares opposite, but from *any* adjacent square.
Six choses to go across the line of scrimmage, allowing him to be closer and run the 12 squares to score.
In the Tad30s solution, it is still possible, but you have to push a much harder opponent. And instead of “Defender Down” being viable, your first Frenzy hit has to be a Push into an empty space (moving the Warrior horizontally), this is because you can’t get “around” any of the Chaos team to push them down.
I think, though, the Saurus actually had an easier solution, like moving around 13 and pushing him down into a cluster to push 12 out.
If you follow the link, we’ve proposed alternative plans. One of which seems to have a “best” solution of only 10% chance of success.
Ahh yes, you beat me to it Melian.
all men LOS?
ï found a 34% / 59% solution against tad defense, based on the frenzy, the blodge break tackle saurus and blitzing the rear beastman (#12)
no block on the los is required
i will try to sent it.
Elyoukey? The same guy who programmed the Samba Calculator? Welcome! YOu can download a template and post in the forums..
http://bbtactics.com/forums/skip-tasteless-blood-bowl-challenge-12-discussion-t2747/